The Bass Comping Library is a free collection of bass lines you can hear, see, and print. Every pattern works in any key and over any chord progression, so you can match the song your students are learning. No account or download needed.
New here? These four steps get a bass line playing in under a minute.
Pick a pattern: click the pattern name or the Change pattern button at the top to open the pattern menu. Beginner Basics is a great place to start.
Choose a key and chords: press Change chords next to Tempo.
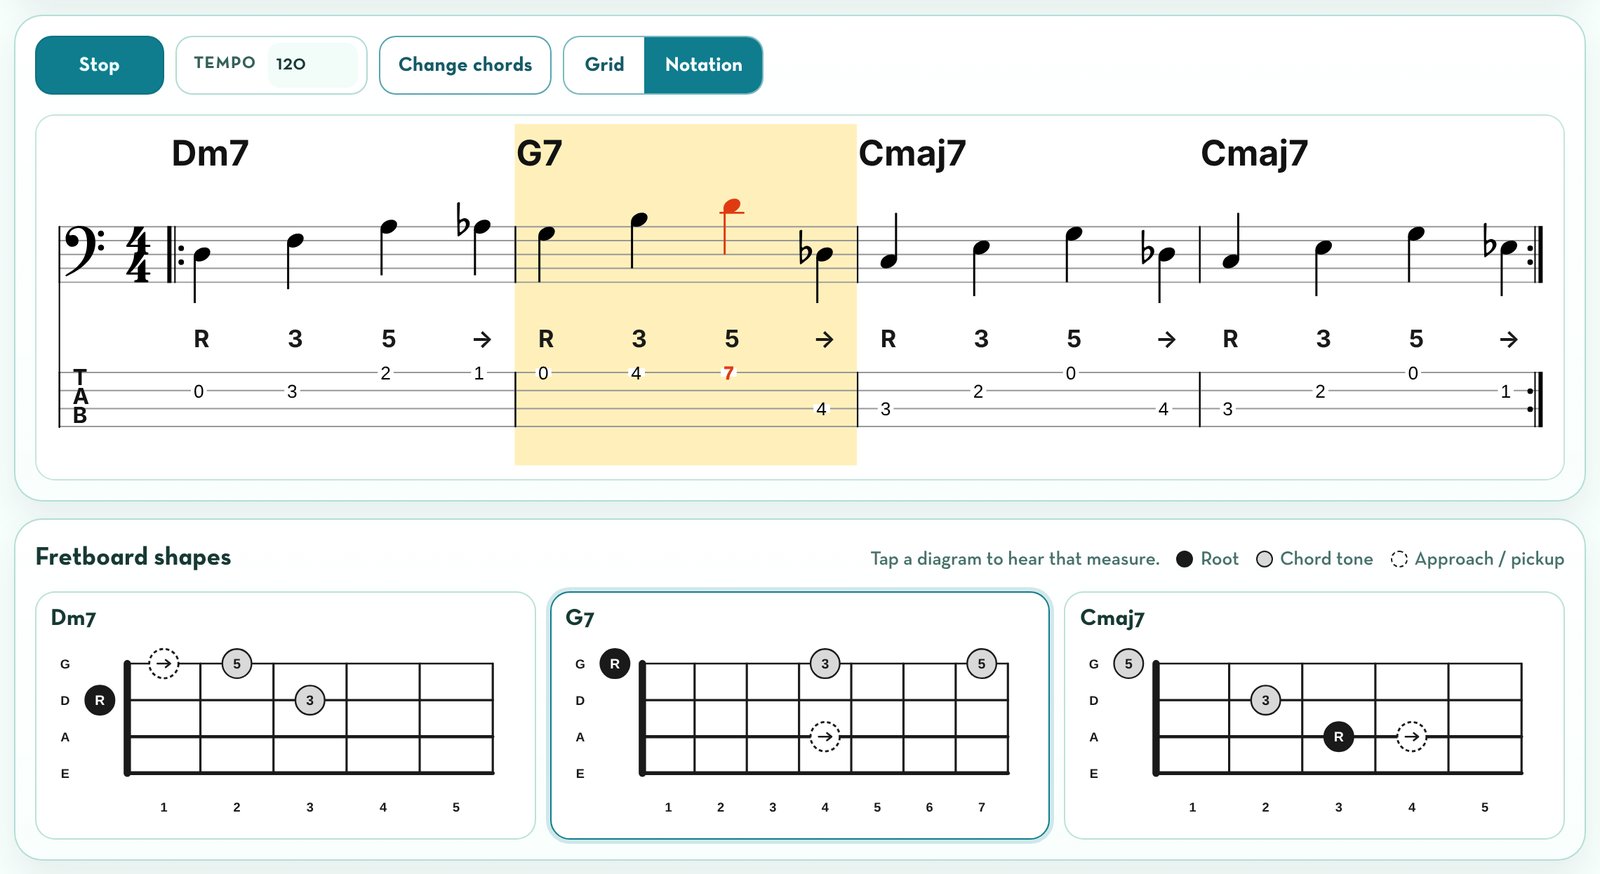
Press Play to hear a one-bar count-in, then the bass line with drums. The bar being played lights up in yellow.
Print or share it. Open Share and export and choose PDF Handout.
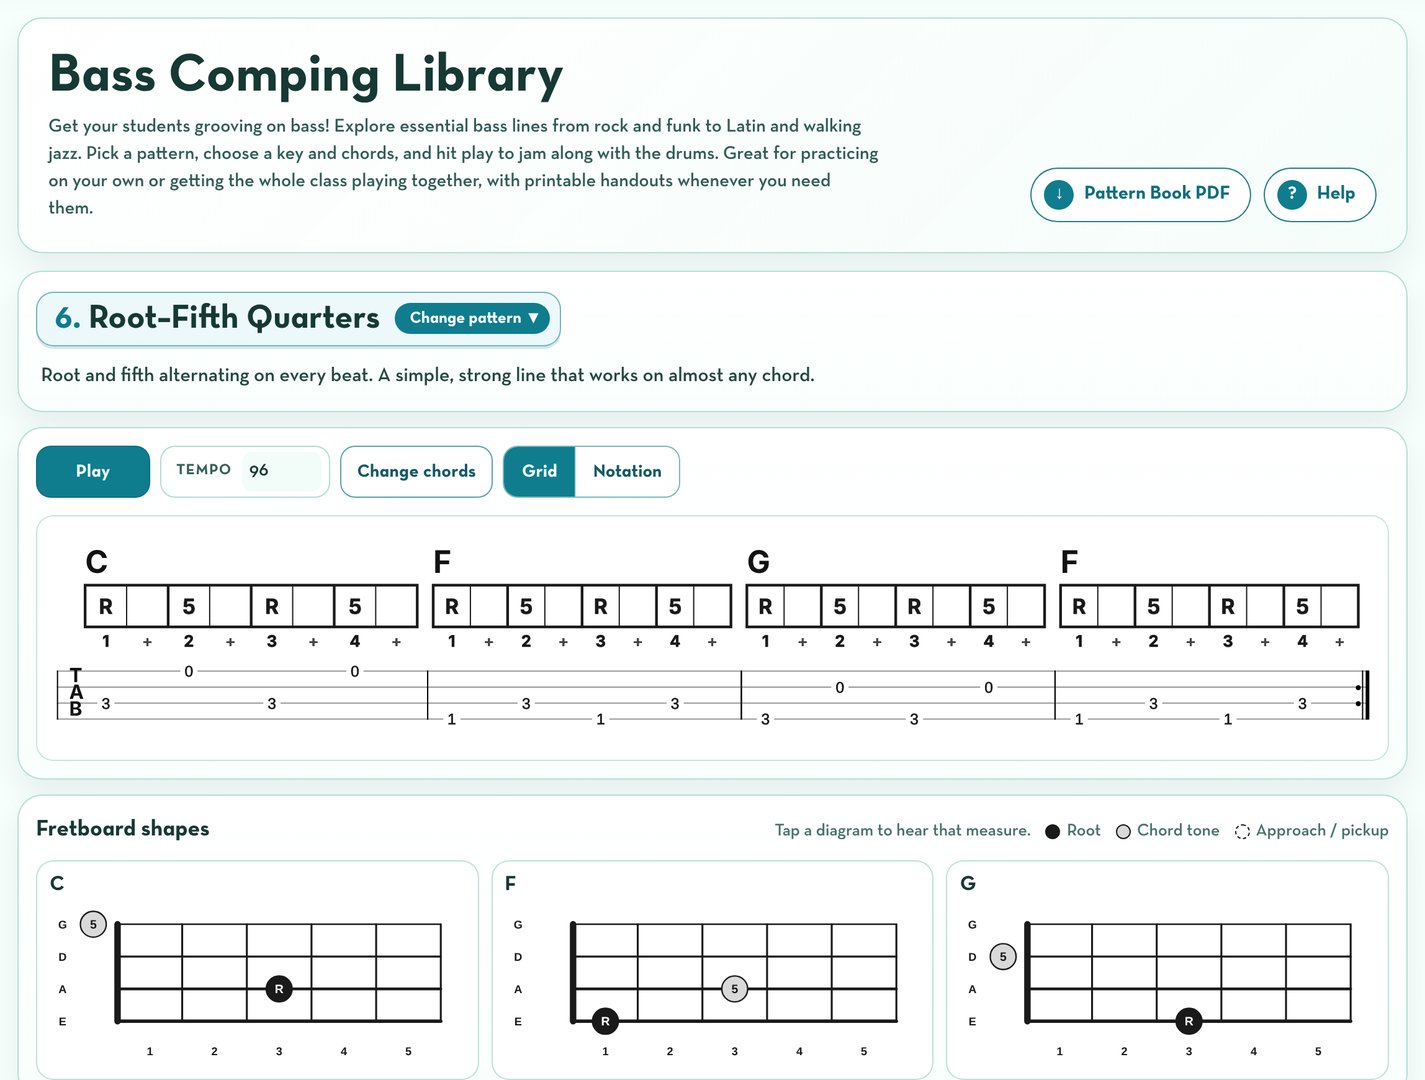
The whole app at a glance: the pattern at the top, music and playback in the middle, fretboard shapes below.
Choose a pattern
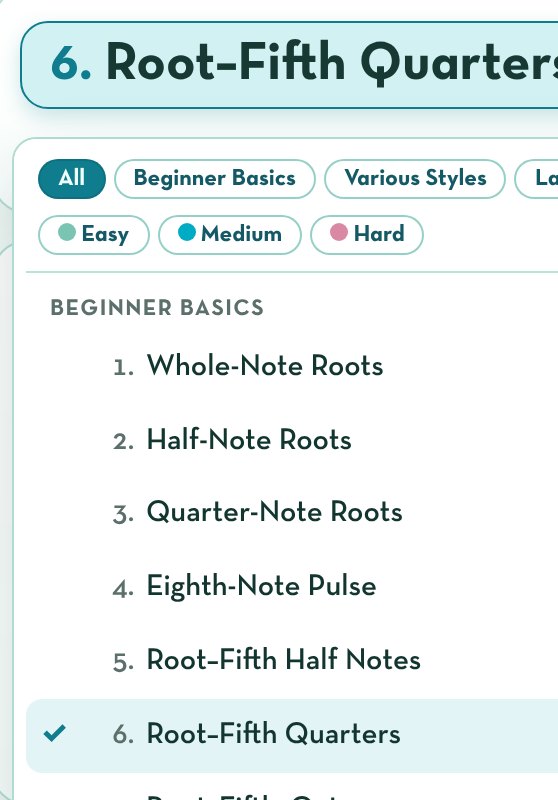
Click the pattern name (or Change pattern) to open the pattern menu. Patterns are grouped by style and numbered to match the Pattern Book PDF, so “pattern 12” means the same thing in class and on paper. Use the style buttons at the top of the menu to show just one group, or choose All to see everything.
Beginner Basics: roots, fifths, octaves, and first approach notes.
Various Styles: rock, disco, Motown, funk, reggae, country, and blues.
Use the Easy, Medium, and Hard buttons to show one level (click again to show all levels). Whatever you choose, patterns are always listed from easiest to hardest. When you choose a pattern, the app sets a tempo, drum groove, and chord progression that suit it. You can change any of these.
The card above the music tells you about the pattern you picked.
Play along
The Play button, Tempo, Change chords, and the Grid / Notation switch sit just above the music. Drums and swing are in the Sound panel below.
Play / Stop starts and stops the music. It loops until you stop it.
Grid / Notation switches between the rhythm grid and written notation (see Reading the music).
Tempo sets the speed in beats per minute. Type a slower number for practice.
Change chords opens the Chord progression panel and takes you right to it.
While the music plays, the bar being played is highlighted in yellow, the note being played turns red, and the current chord's fretboard shape is outlined, so students can follow along.
On a phone, or with a long progression like the 12-bar blues, the page scrolls along with the music so the bar being played stays on screen. If you scroll yourself, it stops following until you press Play again.
During playback, follow the yellow bar and the red note.
Change the key and chords
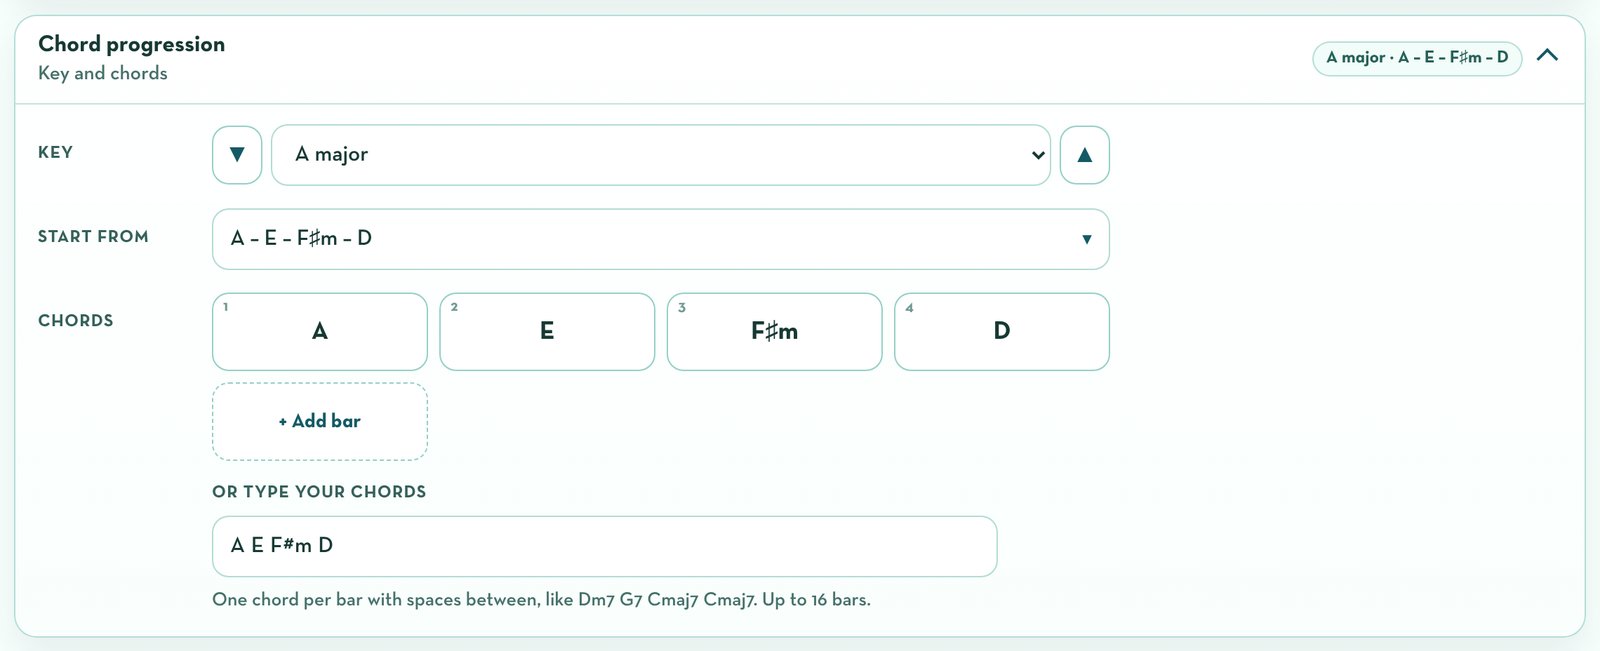
Press Change chords (or open Chord progression below the music). Everything is on three rows:
Key: pick any major or minor key, or use ▼ and ▲ to move the whole pattern down or up by a half step. The notation, tab, and fretboard shapes all update for you.
Start from: choose a ready-made progression. Musical Wonders Progressions come first, so they match the handouts your students already use, followed by Pop & Rock, Blues, Jazz, and Minor progressions.
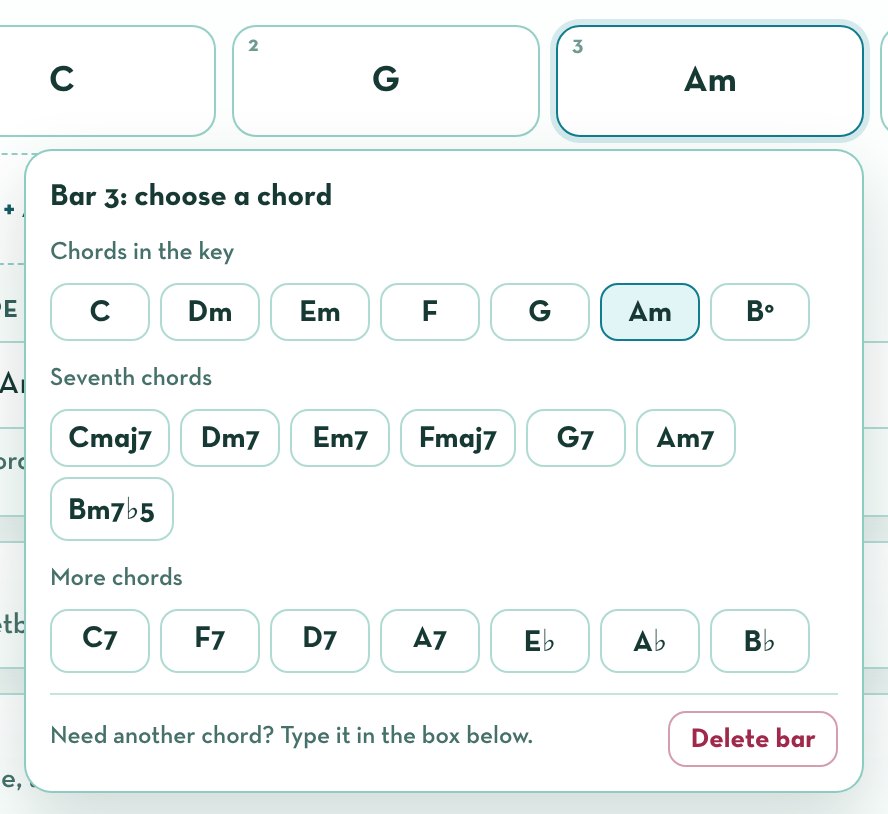
Chords: one button for each bar. Tap a bar to choose a different chord, or to delete the bar. Tap + Add bar to make the progression longer (up to 16 bars).
Want your own progression? Type your chords in the box under the chord buttons, one per bar with spaces between them, like Dm7 G7 Cmaj7 Cmaj7, then press Enter. You can use major (C), minor (Am), seventh (G7), major seventh (Fmaj7), minor seventh (Dm7), half-diminished (Bm7b5), and diminished (B°) chords, with sharps (#) and flats (b). Chords like C9 or C6 play as their simpler version (C7, C).
When you change key, your chords move with it. Teachers who use Roman numerals can turn on Show Roman numerals for chords in the Display panel.
Reading the music
Use the Grid / Notation switch above the music to choose how it's shown. Beginner Basics open in Grid; every other pattern opens in Notation. You can switch any time, even while the music plays.
Grid: each box is a count. Play what's in the box (R, 3, 5…) and count 1 + 2 + 3 + 4 + out loud.
In Grid view, each bar is a row of boxes, one for each count, with the tab underneath lined up with the boxes. It's the quickest way to see the rhythm without reading notes. Fast patterns use sixteenth-note boxes (1 e + a).
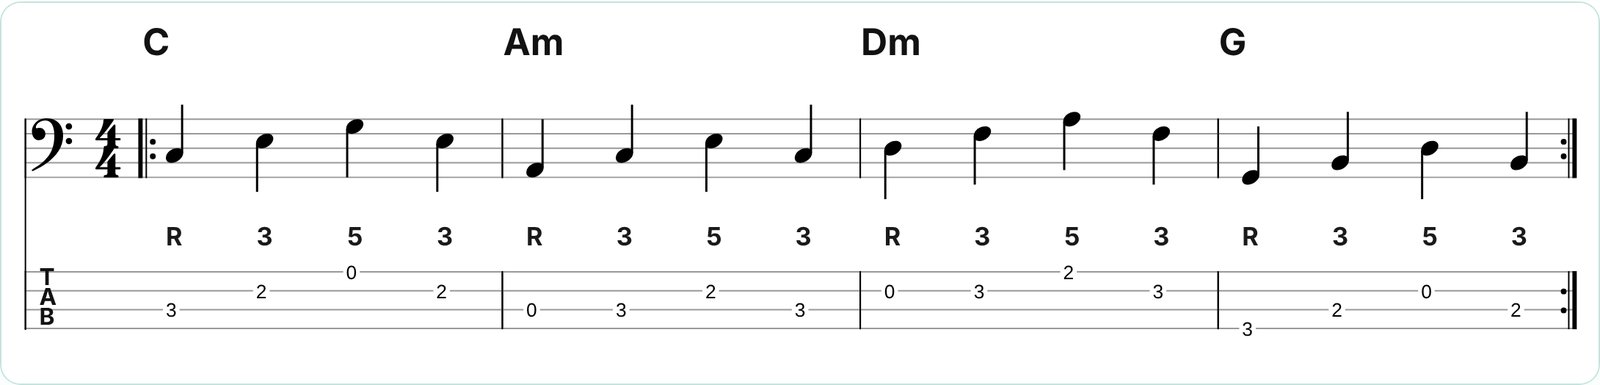
In Notation view, each pattern is shown three ways, so every student can find a way in.
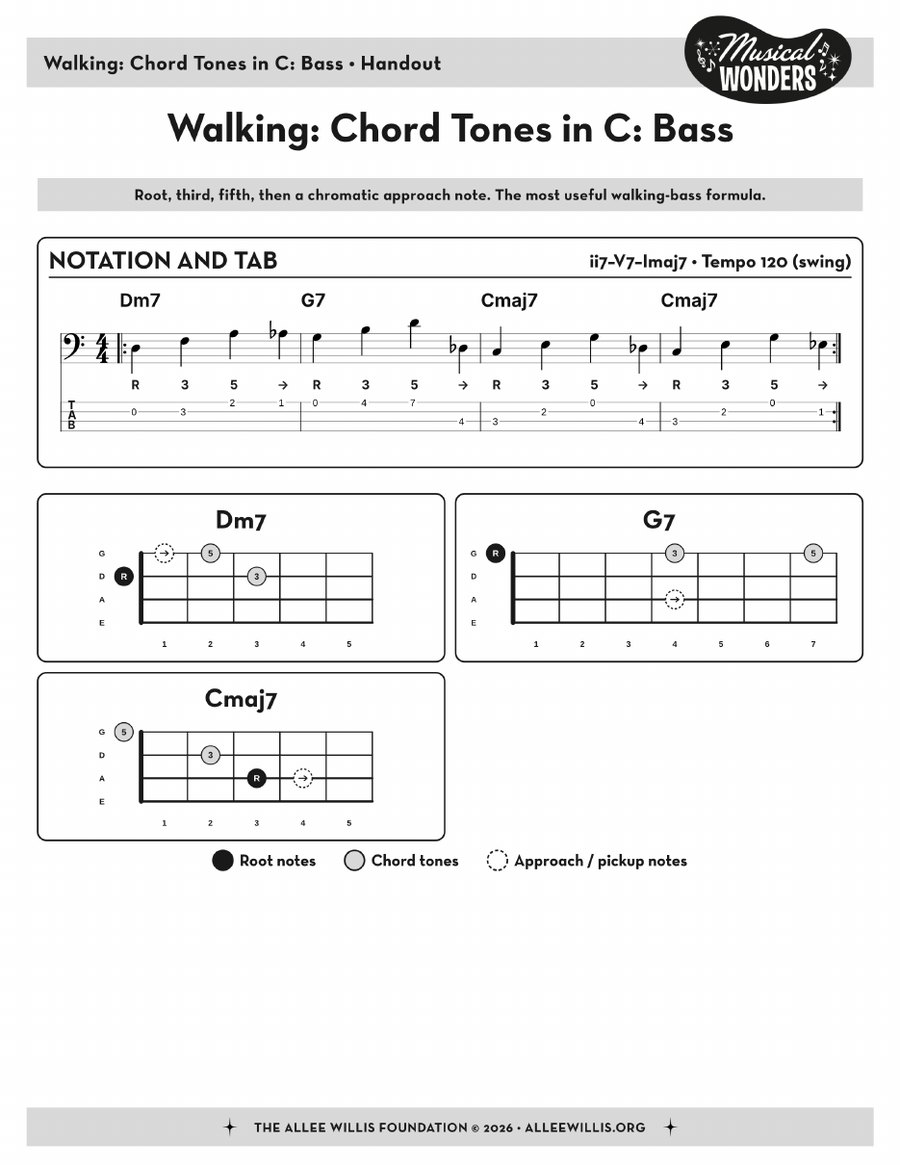
Chord names on top, notation in the middle, chord degrees under each note, and tab at the bottom.
Notation is written in bass clef. As is standard for bass guitar, it is written an octave higher than it sounds, so it fits on the staff.
Chord degrees under each note show the note's job in the chord: R is the root, 3 is the third, 5 is the fifth, and so on.
Tab shows which fret to play on each string, for a 4-string bass in standard tuning (E A D G). The top line is the G string.
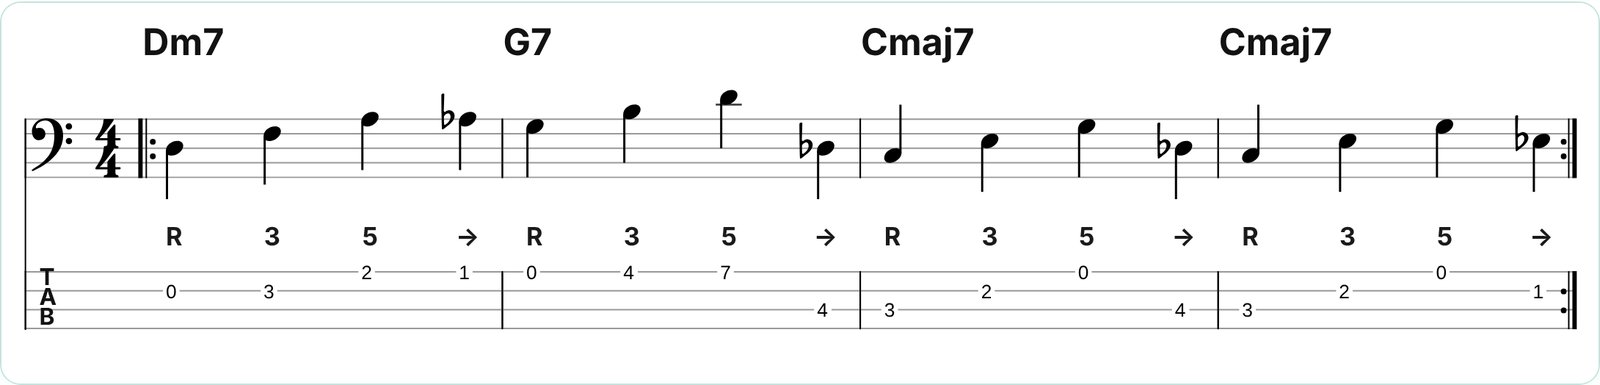
An arrow → marks an approach note: a note one fret away from the next chord's root that leads smoothly into it. →R means the next chord's root is played a little early.
In walking bass, beat 4 is often an approach note into the next chord.
Fretboard shapes
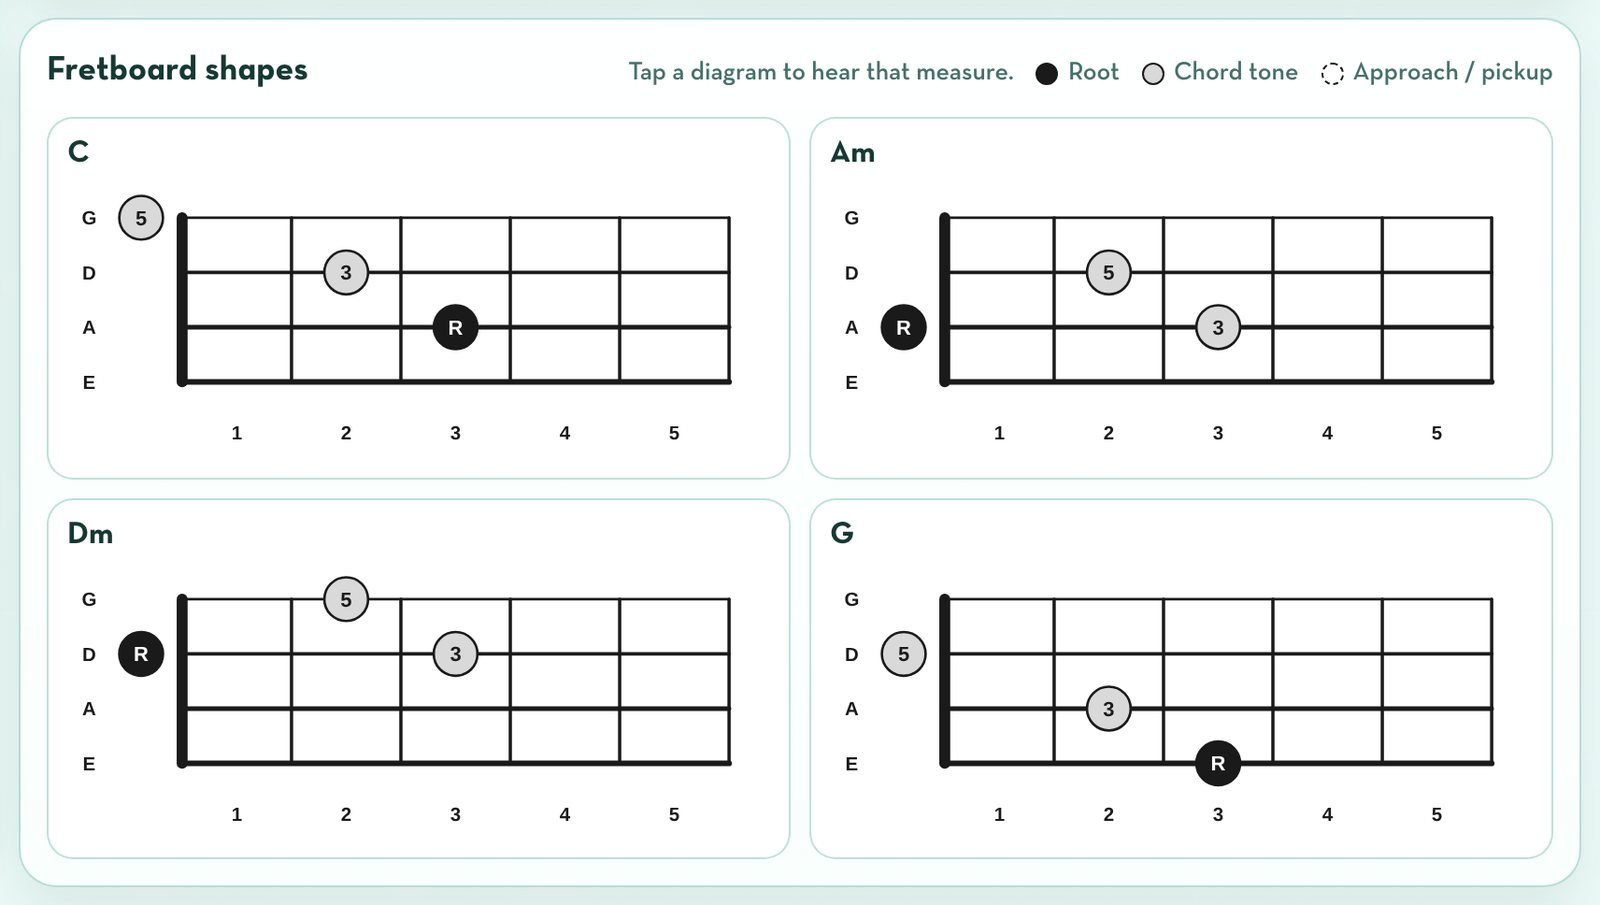
Below the music, there is one diagram for each chord in the progression. They match the style of our printed bass handouts: the G string is on top, the E string is on the bottom, and the fret numbers run along the bottom.
Black circles are roots.
Gray circles are other chord tones.
Dashed circles are approach or pickup notes.
Tap or click a diagram to hear that bar on its own. It's a quick way to check a shape before playing.
Display options
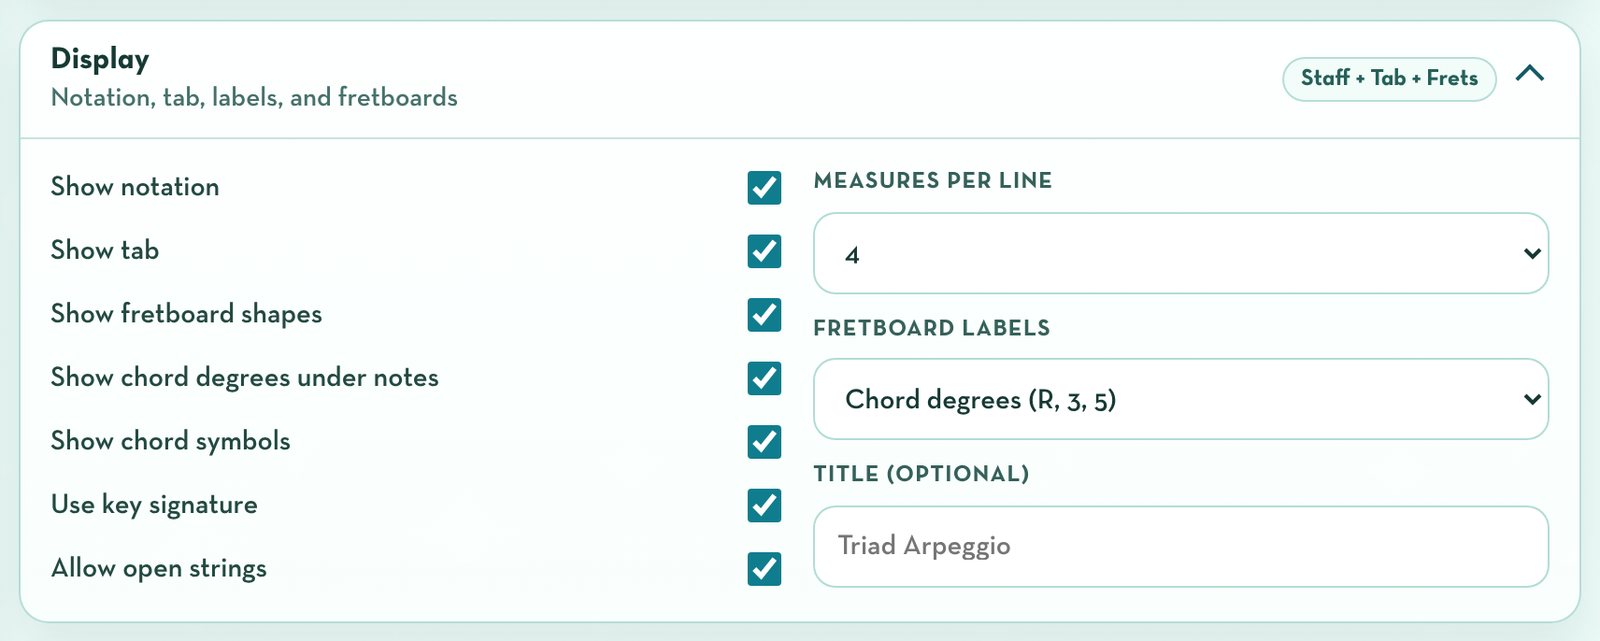
Open Display to choose what appears on screen and on your handouts.
Show or hide the notation, the tab, the fretboard shapes, the chord degrees, or the chord names.
Turn the key signature off if your students prefer to see every sharp and flat written in.
Show Roman numerals for chords: adds I, IV, V and so on under the chord buttons and in the progression menu.
Allow open strings: turn this off to keep every note fretted, which makes the shapes easy to move to other keys.
Measures per line and Fretboard labels (chord degrees, note names, playing order, or no labels).
Title: give your handout its own name.
Sound options
Open Sound to turn the drums on or off, choose a different drum groove, or balance the bass and drum volumes.
Swing gives the eighth notes a long-short, bouncy feel, used in blues and jazz.
One-bar count-in is on to start, so everyone comes in together. Turn it off to start right away.
Share and print
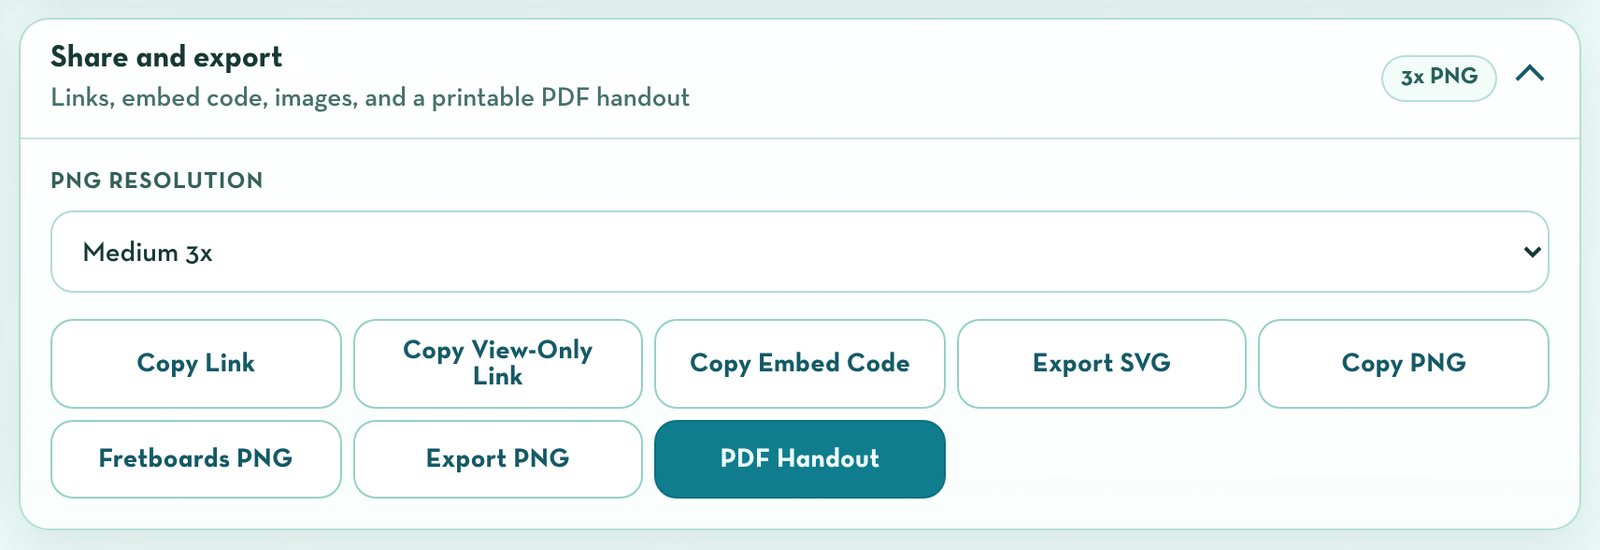
Open Share and export to take your pattern out of the app. Everything you set up (pattern, key, chords, tempo, and display) comes with it.
Copy Link: a link that opens the app exactly as you set it up.
Copy View-Only Link: the same, with the editing menus hidden. Great for students.
Copy Embed Code: put a playable version on your class website or learning platform.
Export SVG / Export PNG / Copy PNG: images of the music for slides and worksheets.
Fretboards PNG: all the fretboard shapes as one image.
PDF Handout: a printable, black-and-white handout in the same style as our curriculum handouts.
Pattern Book PDF (at the top of the app): every pattern in one printable packet.
A PDF handout, ready to print.
Questions
Why is there no sound?
Check that your device isn't muted and its volume is up. On a phone or tablet, turn off silent mode. Then press Play again.
Can students use it on phones and tablets?
Yes. On small screens the music is shown one bar per line so it is easy to read.
Do I need an account?
No. The app is free and works in your web browser. Nothing is saved to an account, so use Copy Link to keep a setup.
What if I need a 5-string bass or a different tuning?
The tab and fretboard shapes are for a 4-string bass in standard tuning. The notation works for any bass.
Several of the Latin patterns (bossa nova, samba, tumbao, cha-cha-chá, merengue, and bolero) are based on the examples in Victor López's clinic handout “Latin Rhythms: Mystery Unraveled” (The Midwest Clinic, 2005). These patterns are marked in the app. We also thank the music educators whose feedback helped improve the Latin patterns.